内核核心
临界区保护
uint32_t tTaskEnterCritical (void)
{
    uint32_t primask = __get_PRIMASK();
    __disable_irq();        // CPSID I
    return primask;
}
void tTaskExitCritical (uint32_t status) {
    __set_PRIMASK(status);
}
关于临界区保护问题,最重要的是PRIMASK寄存器,这些是为了保证我们临界区之内的操作是原子操作

进入临界区的时候使用tTaskEnterCritical ,它将返回当前的PRIMASK
退出临界区的时候使用tTaskExitCritical ,传入的参数即tTaskEnterCritical 的返回值,恢复之前的PRIMASK
调度锁保护
void tTaskSchedInit (void)
{
    schedLockCount = 0;
}
void tTaskSchedDisable (void)
{
    uint32_t status = tTaskEnterCritical();
    if (schedLockCount < 255)
    {
        schedLockCount++;
    }
    tTaskExitCritical(status);
}
void tTaskSchedEnable (void)
{
    uint32_t status = tTaskEnterCritical();
    if (schedLockCount > 0)
    {
        if (--schedLockCount == 0)
        {
            tTaskSched();
        }
    }
    tTaskExitCritical(status);
}
调度锁功能
- 上锁时,禁止任务进行切换。无论何种情况。例如时间片用完,也不切换任务
- 解锁时,允许任务切换
调度锁在临界区的基础上加入了调度锁计数变量,这里采用的是uint8而不是简单的bool,是因为调度锁之间会有嵌套,如果简单的使用bool,内层函数的调度会过早开启调度;除此以外,使用计数器可以提供更细粒度的调度控制。例如,在执行多个临界操作时,可以多次禁用调度,然后在所有操作完成后再一次性启用调度
但此代码任然存在bug,必须严格按照调度锁的使用规范——先禁用后允许,直接使用允许也不会开启任务调度
位图数据结构
void tBitmapInit (tBitmap * bitmap)
{
	bitmap->bitmap = 0;
}
uint32_t tBitmapPosCount (void)
{
	return 32;
}
void tBitmapSet (tBitmap * bitmap, uint32_t pos)
{
	bitmap->bitmap |= 1 << pos;
}
void tBitmapClear (tBitmap * bitmap, uint32_t pos)
{
	bitmap->bitmap &= ~(1 << pos);
}
uint32_t tBitmapGetFirstSet (tBitmap * bitmap)
{
	static const uint8_t quickFindTable[] =
	{
	    /* 00 */ 0xff, 0, 1, 0, 2, 0, 1, 0, 3, 0, 1, 0, 2, 0, 1, 0,
	    /* 10 */ 4,    0, 1, 0, 2, 0, 1, 0, 3, 0, 1, 0, 2, 0, 1, 0,
	    /* 20 */ 5,    0, 1, 0, 2, 0, 1, 0, 3, 0, 1, 0, 2, 0, 1, 0,
	    /* 30 */ 4,    0, 1, 0, 2, 0, 1, 0, 3, 0, 1, 0, 2, 0, 1, 0,
	    /* 40 */ 6,    0, 1, 0, 2, 0, 1, 0, 3, 0, 1, 0, 2, 0, 1, 0,
	    /* 50 */ 4,    0, 1, 0, 2, 0, 1, 0, 3, 0, 1, 0, 2, 0, 1, 0,
	    /* 60 */ 5,    0, 1, 0, 2, 0, 1, 0, 3, 0, 1, 0, 2, 0, 1, 0,
	    /* 70 */ 4,    0, 1, 0, 2, 0, 1, 0, 3, 0, 1, 0, 2, 0, 1, 0,
	    /* 80 */ 7,    0, 1, 0, 2, 0, 1, 0, 3, 0, 1, 0, 2, 0, 1, 0,
	    /* 90 */ 4,    0, 1, 0, 2, 0, 1, 0, 3, 0, 1, 0, 2, 0, 1, 0,
	    /* A0 */ 5,    0, 1, 0, 2, 0, 1, 0, 3, 0, 1, 0, 2, 0, 1, 0,
	    /* B0 */ 4,    0, 1, 0, 2, 0, 1, 0, 3, 0, 1, 0, 2, 0, 1, 0,
	    /* C0 */ 6,    0, 1, 0, 2, 0, 1, 0, 3, 0, 1, 0, 2, 0, 1, 0,
	    /* D0 */ 4,    0, 1, 0, 2, 0, 1, 0, 3, 0, 1, 0, 2, 0, 1, 0,
	    /* E0 */ 5,    0, 1, 0, 2, 0, 1, 0, 3, 0, 1, 0, 2, 0, 1, 0,
	    /* F0 */ 4,    0, 1, 0, 2, 0, 1, 0, 3, 0, 1, 0, 2, 0, 1, 0
	};

	if (bitmap->bitmap & 0xff)
    {
        return quickFindTable[bitmap->bitmap & 0xff];
    }
    else if (bitmap->bitmap & 0xff00)
    {
        return quickFindTable[(bitmap->bitmap >> 8) & 0xff] + 8;
    }
    else if (bitmap->bitmap & 0xff0000)
    {
        return quickFindTable[(bitmap->bitmap >> 16) & 0xff] + 16;
    }
    else if (bitmap->bitmap & 0xFF000000)
    {
        return quickFindTable[(bitmap->bitmap >> 24) & 0xFF] + 24;
    }
    else
    {
        return tBitmapPosCount();
    }
}
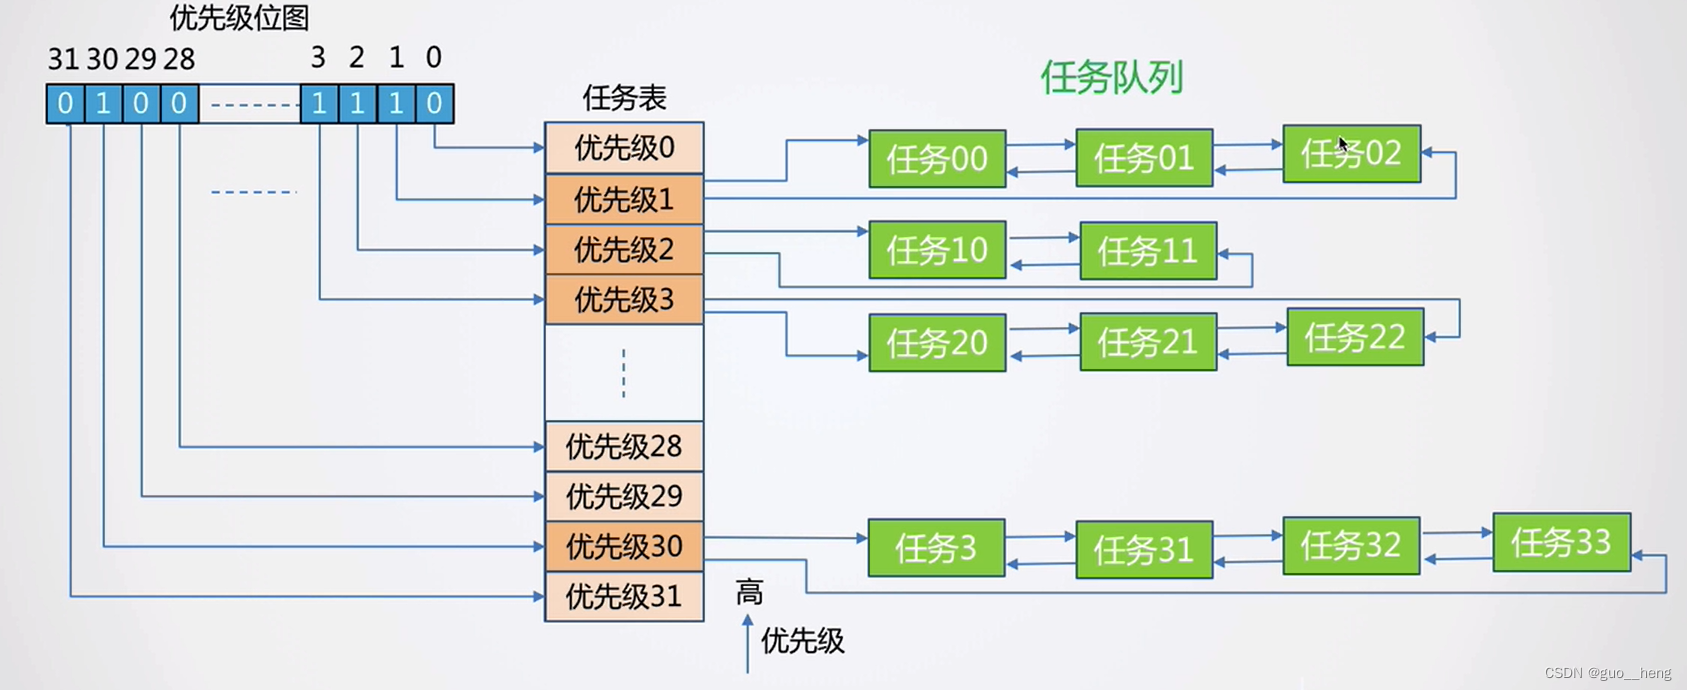
需要重视的是tBitmapGetFirstSet函数,该函数采用的是查表算法
表为quickFindTable,每8位作为一个查询段,查到在这个段里面通过计算锁定到表内,最后得到优先级
多优先级任务
tTask * tTaskHighestReady (void)
{
    uint32_t highestPrio = tBitmapGetFirstSet(&taskPrioBitmap);
    return taskTable[highestPrio];
}
void tTaskSched (void)
{
    tTask * tempTask;
    uint32_t status = tTaskEnterCritical();
    // 如何调度器已经被上锁,则不进行调度,直接退
    if (schedLockCount > 0)
    {
        tTaskExitCritical(status);
        return;
    }
    // 找到优先级最高的任务,如果其优先级比当前任务的还高,那么就切换到这个任务
    tempTask = tTaskHighestReady();
    if (tempTask != currentTask)
    {
        nextTask = tempTask;
        tTaskSwitch();
    }
    // 退出临界区
    tTaskExitCritical(status);
}
修改调度算法,我们创建一个taskTable(优先级为0,就存在数组0号位置)数组保存每个任务优先级,以及在任务初始化的时候,在位图上置1;在调度算法中,我们首先需要判断调度锁是否上锁,然后通过tTaskHighestReady(其实是位图中的查表算法找到首先被置1的位),返回值即是task指针,最后判断是否是当前任务,是则不管,否则就切换最高优先级
void tTaskSchedRdy (tTask * task)
{
    taskTable[task->prio] = task;
    tBitmapSet(&taskPrioBitmap, task->prio);
}
void tTaskSchedUnRdy (tTask * task)
{
    taskTable[task->prio] = (tTask *)0;
    tBitmapClear(&taskPrioBitmap, task->prio);
}
这两个函数分别是设置就绪任务和移除就绪任务的
大致思路是有一个bitmap,将我们任务优先级那位设置为1就是就绪,否则就是移除
这里会存在一个问题——一个优先级只能有一个任务
双向链表数据结构
#define tNodeParent(node, parent, name) (parent *)((uint32_t)node - (uint32_t)&((parent *)0)->name)
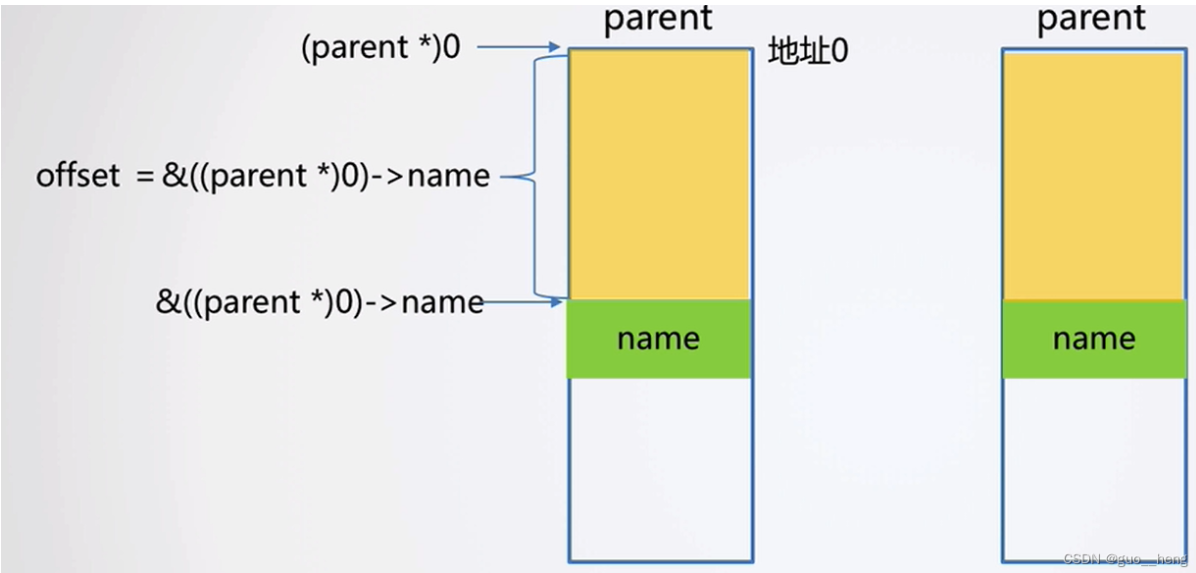
这个宏tNodeparent的作用是通过结构体中的一个成员变量(node)的地址,来计算出其所在结构体的起始地址。这样就能通过该成员变量,反向获取包含它的父结构体的指针
这一部分暂时还没使用到
链表节点的定义
// tinyOS链表的结点类型
typedef struct _tNode
{
	// 该结点的前一个结点
    struct _tNode * preNode;

    // 该结点的后一个结点
    struct _tNode * nextNode;
}tNode;
// tinyOS链表类型
typedef struct _tList
{
	// 该链表的头结点
    tNode headNode;

    // 该链表中所有结点数量
    uint32_t nodeCount;
}tList;
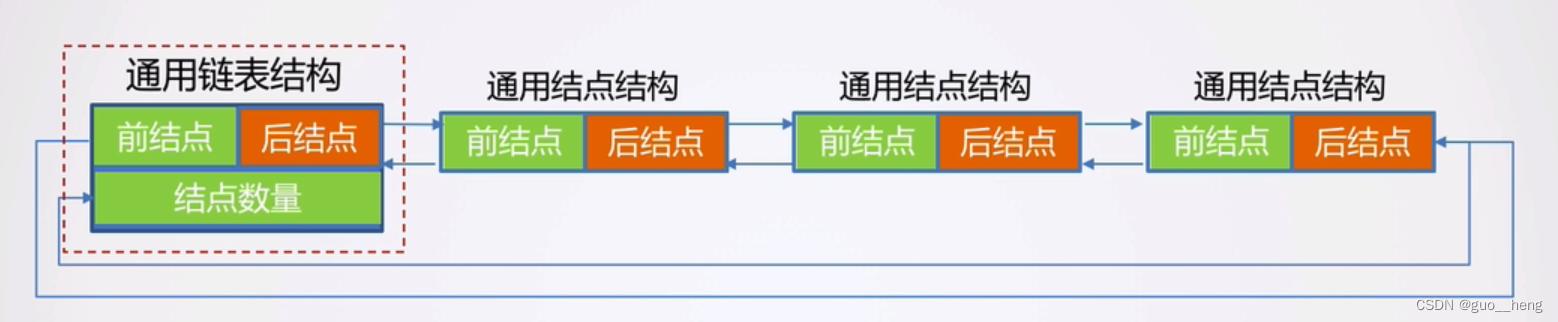
初始化比较简单,链表包含两个成员,一个头结点,一个结点数量;而结点包含前结点和后结点
总体来说大致是如下结构
链表节点的初始化
#define firstNode   headNode.nextNode
#define lastNode    headNode.preNode
void tNodeInit (tNode * node)
{
    node->nextNode = node;
    node->preNode = node;
}

void tListInit (tList * list)
{
		list->firstNode = &(list->headNode);
    list->lastNode = &(list->headNode);
    list->nodeCount = 0;
}
在tNodeInit中,这种初始化是较为合理的,在没有连接到其他结点时,可以被安全地操作
在tListInit中,初始化方法基本跟tNodeInit类似,将前结点和后结点的指针都指向自己
链表节点的基础功能
uint32_t tListCount (tList * list)
{
	return list->nodeCount;
}
tNode * tListFirst (tList * list)
{
    tNode * node = (tNode *)0;

	if (list->nodeCount != 0)
	{
		node = list->firstNode;
	}
    return  node;
}
tNode * tListLast (tList * list)
{
    tNode * node = (tNode *)0;

	if (list->nodeCount != 0)
	{
		node = list->lastNode;
	}
    return  node;
}
tNode * tListPre (tList * list, tNode * node)
{
	if (node->preNode == node)
	{
		return (tNode *)0;
	}
	else
	{
		return node->preNode;
	}
}
tNode * tListNext (tList * list, tNode * node)
{
	if (node->nextNode == node)
	{
		return (tNode *)0;
	}
	else
	{
		return node->nextNode;
	}
}
链表节点的插入删除
void tListRemoveAll (tList * list)
{
    uint32_t count;
    tNode * nextNode;
    // 遍历所有的结点
	  nextNode = list->firstNode;
    for (count = list->nodeCount; count != 0; count-- )
    {
    	// 先纪录下当前结点,和下一个结点
    	// 必须纪录下一结点位置,因为在后面的代码中当前结点的next会被重置
        tNode * currentNode = nextNode;
        nextNode = nextNode->nextNode;
        // 重置结点自己的信息
        currentNode->nextNode = currentNode;
        currentNode->preNode = currentNode;
    }
    list->firstNode = &(list->headNode);
    list->lastNode = &(list->headNode);
    list->nodeCount = 0;
}
void tListAddFirst (tList * list, tNode * node)
{
    node->preNode = list->firstNode->preNode;
    node->nextNode = list->firstNode;
    list->firstNode->preNode = node;
    list->firstNode = node;
    list->nodeCount++;
}
void tListAddLast (tList * list, tNode * node)
{
		node->nextNode = &(list->headNode);
    node->preNode = list->lastNode;
    list->lastNode->nextNode = node;
    list->lastNode = node;
    list->nodeCount++;
}
tNode * tListRemoveFirst (tList * list)
{
    tNode * node = (tNode *)0;
	if( list->nodeCount != 0 )
    {
        node = list->firstNode;
        node->nextNode->preNode = &(list->headNode);
        list->firstNode = node->nextNode;
        list->nodeCount--;
    }
    return  node;
}
void tListInsertAfter (tList * list, tNode * nodeAfter, tNode * nodeToInsert)
{
    nodeToInsert->preNode = nodeAfter;
    nodeToInsert->nextNode = nodeAfter->nextNode;
    nodeAfter->nextNode->preNode = nodeToInsert;
    nodeAfter->nextNode = nodeToInsert;
    list->nodeCount++;
}
void tListRemove (tList * list, tNode * node)
{
    node->preNode->nextNode = node->nextNode;
    node->nextNode->preNode = node->preNode;
    list->nodeCount--;
}
任务延时队列
typedef struct _tTask {
    tTaskStack * stack;
    // 任务延时计数器
    uint32_t delayTicks;
    // 延时结点:通过delayNode就可以将tTask放置到延时队列中
    tNode delayNode;
    // 任务的优先级
    uint32_t prio;
    // 任务当前状态
    uint32_t state;
 }tTask;
在tTask结构体中新增state和delayNode
大致思路如下,每个任务的delayNode都加入在延时列表中
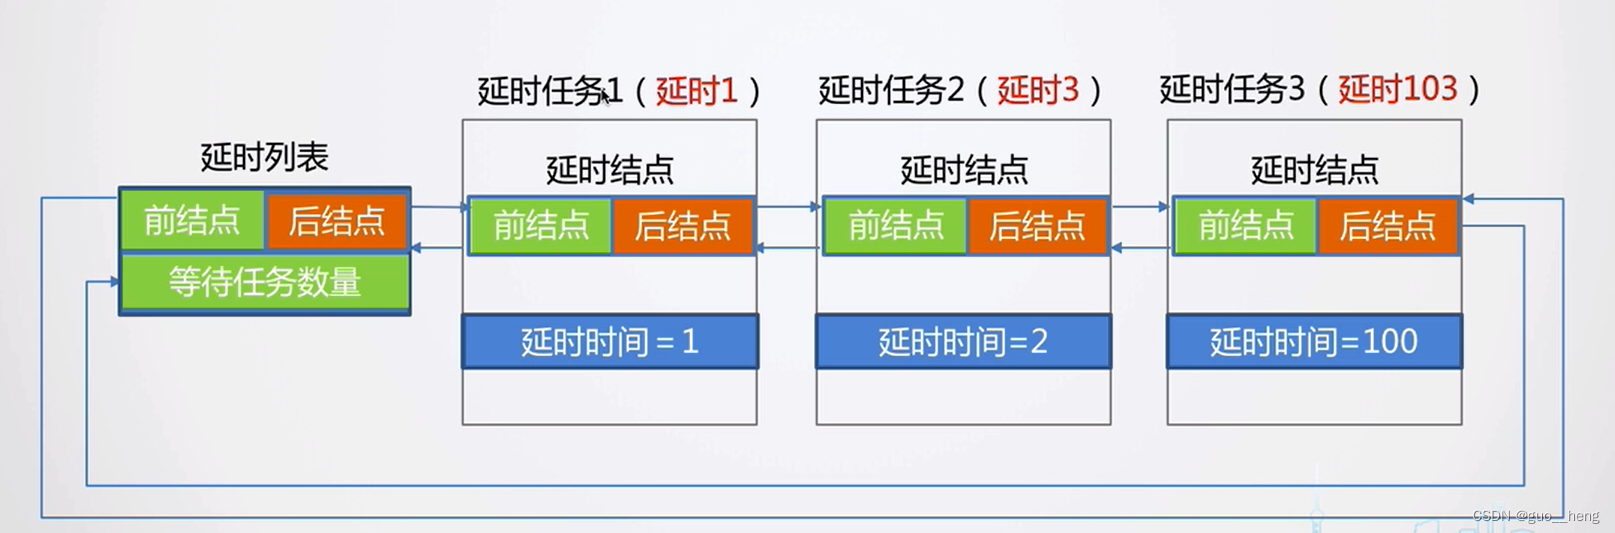
void tTimeTaskWait (tTask * task, uint32_t ticks)
{
    task->delayTicks = ticks;
    tListAddLast(&tTaskDelayedList, &(task->delayNode));
    task->state |= TINYOS_TASK_STATE_DELAYED;
}
增加tTimeTaskWait ,功能是将任务加入延时队列,采用的是尾插法插入列表,这里不需要考虑基于延时时间大小的顺序问题,在下方tTaskSystemTickHandler中会对所有tick减减,优先级问题会在tick减完之后,开启调度的函数中考虑
void tTaskSystemTickHandler ()
{
    tNode * node;
    // 进入临界区,以保护在整个任务调度与切换期间,不会因为发生中断导致currentTask和nextTask可能更改
    uint32_t status = tTaskEnterCritical();
    // 检查所有任务的delayTicks数,如果不0的话,减1。
    for (node = tTaskDelayedList.headNode.nextNode; node != &(tTaskDelayedList.headNode); node = node->nextNode)
    {
        tTask * task = tNodeParent(node, tTask, delayNode);
        if (--task->delayTicks == 0)
        {
            // 将任务从延时队列中移除
            tTimeTaskWakeUp(task);
            // 将任务恢复到就绪状态
            tTaskSchedRdy(task);
        }
    }
     // 退出临界区
    tTaskExitCritical(status);
    // 这个过程中可能有任务延时完毕(delayTicks = 0),进行一次调度。
    tTaskSched();
}
在tTaskSystemTickHandler函数中,将遍历tTaskTable改为遍历tTaskDelayedList,也就是延时队列
这里需要理解深刻的是,在当前版本是有两个数据表的,一个是延时队列,一个是就绪表,前者会将任务从就绪表里面增删,进而影响后者
同优先级时间片运行
typedef struct _tTask {
    tTaskStack * stack;
    // 连接结点
    tNode linkNode;
    // 任务延时计数器
    uint32_t delayTicks;
    // 延时结点:通过delayNode就可以将tTask放置到延时队列中
    tNode delayNode;
    // 任务的优先级
    uint32_t prio;
    // 任务当前状态
    uint32_t state;
    // 当前剩余的时间片
    uint32_t slice;
 }tTask;
在tTask结构体中新增linkNode和slice
思路大致如下,对于每一个优先级,我们会维护一个列表,这个列表在源码是taskTable数组
tTask *tTaskHighestReady()
{
	uint32_t highestPrio = tBitmapGetFirstSet(&taskPrioBitmap);
	tNode *node = tListFirst(&taskTable[highestPrio]);
	return (tTask *)tNodeParent(node, tTask, linkNode);
}
void tTaskSchedRdy (tTask * task)
{
    tListAddLast(&taskTable[task->prio], &(task->linkNode));
    tBitmapSet(&taskPrioBitmap, task->prio);
}
void tTaskSchedUnRdy (tTask * task)
{
    tListRemove(&taskTable[task->prio], &(task->linkNode));
    // 队列中可能存在多个任务。只有当没有任务时,才清除位图标记
    if (tListCount(&taskTable[task->prio]) == 0)
    {
        tBitmapClear(&taskPrioBitmap, task->prio);
    }
}
void tTaskSystemTickHandler (void)
{
    tNode * node;
    // 进入临界区,以保护在整个任务调度与切换期间,不会因为发生中断导致currentTask和nextTask可能更改
    uint32_t status = tTaskEnterCritical();
    // 检查所有任务的delayTicks数,如果不0的话,减1。
    for (node = tTaskDelayedList.headNode.nextNode; node != &(tTaskDelayedList.headNode); node = node->nextNode)
    {
        tTask * task = tNodeParent(node, tTask, delayNode);
        if (--task->delayTicks == 0)
        {
            // 将任务从延时队列中移除
            tTimeTaskWakeUp(task);
            // 将任务恢复到就绪状态
            tTaskSchedRdy(task);
        }
    }
    // 检查下当前任务的时间片是否已经到了
    if (--currentTask->slice == 0)
    {
        // 如果当前任务中还有其它任务的话,那么切换到下一个任务
        // 方法是将当前任务从队列的头部移除,插入到尾部
        // 这样后面执行tTaskSched()时就会从头部取出新的任务取出新的任务作为当前任务运行
        if (tListCount(&taskTable[currentTask->prio]) > 0)
        {
            tListRemoveFirst(&taskTable[currentTask->prio]);
            tListAddLast(&taskTable[currentTask->prio], &(currentTask->linkNode));
            // 重置计数器
            currentTask->slice = TINYOS_SLICE_MAX;
        }
    }
     // 退出临界区
    tTaskExitCritical(status);
    // 这个过程中可能有任务延时完毕(delayTicks = 0),进行一次调度
    tTaskSched();
}
在tTaskHighestReady中,相比之前的版本,增加了查列表首结点的函数,在我们的任务队列中,采用的是同一优先级,先进入的先出来
tTaskSchedRdy和tTaskSchedUnRdy,需要注意的是tTaskSchedUnRdy,它需要判断这个优先级里面
没有任务,才会去清除bitmap
在tTaskSystemTickHandler 中,新增任务队列增删,但和延时队列有所不同的是,他并不会将他完全删除,而是先删除后添加,添加到队列末尾